Tom Yum Goong

I wanted to make this dish since last week. Just realized that I have 1.5 lt of the shrimp broth and I need to make something with it because freezer start to be too full with many kind of stocks. Beef, chicken, shrimp and veggie stocks.

So finally today I made it, but completely forgot to get cilantro and basil. Auch!

So, this one is a twisted Tom Yum, but I LOVE it since I did something really different and this soup became sweet and sour and WITHOUT adding any sugar or sweetener!

Let’s start!

Ingredients:

  • 2 cm of ginger, crush it
  • 2 cm of galangal, crush it
  • 2 lemon grass, crush it
  • 3 green tomatoes, quarter it
  • 1 red tomato, cut to 8
  • Lime leaves
  • Big red chilies
  • Small red chilies
  • Small bird chili
  • Shallots (as much as 1 big yellow onion), slice it
  • 2 garlic cloves, crush it
  • 200 gr of shrimp/ prawn
  • 2 big squids, cut it to bite size. DO NOT throw away the squid ink. This is the “sugar replacement”
  • Salt
  • White pepper
  • Lime juice

Instructions:

  1. Prep up the shrimp and the squid. Pour in the lime juice, salt and white pepper.
  2. Heat up the pot in medium flame, add in oil, and once ready, add in the shallots and the garlic. As usual, the key to whole and deep and sweet flavor is to caramelize the shallots/ onion!
  3. Once almost caramelized, add in the lime leaves, ginger, galangal, and lemon grass, continue until you see your onion/ shallots is caramelized.
  4. Add in red tomatoes, mix it in for about 1 minute, followed by green tomatoes, and the chilies, and pour the shrimp broth. Wait until it starts bubbling. Then lower the flame and simmer for about 10 mins.
  5. Then, add in the shrimp and squid only until the shrimp goes red. (Around 4-5 mins)

That’s it.
Yes, it’s that easy. Spicy, sweet, sour, hot and fresh for the hot day!

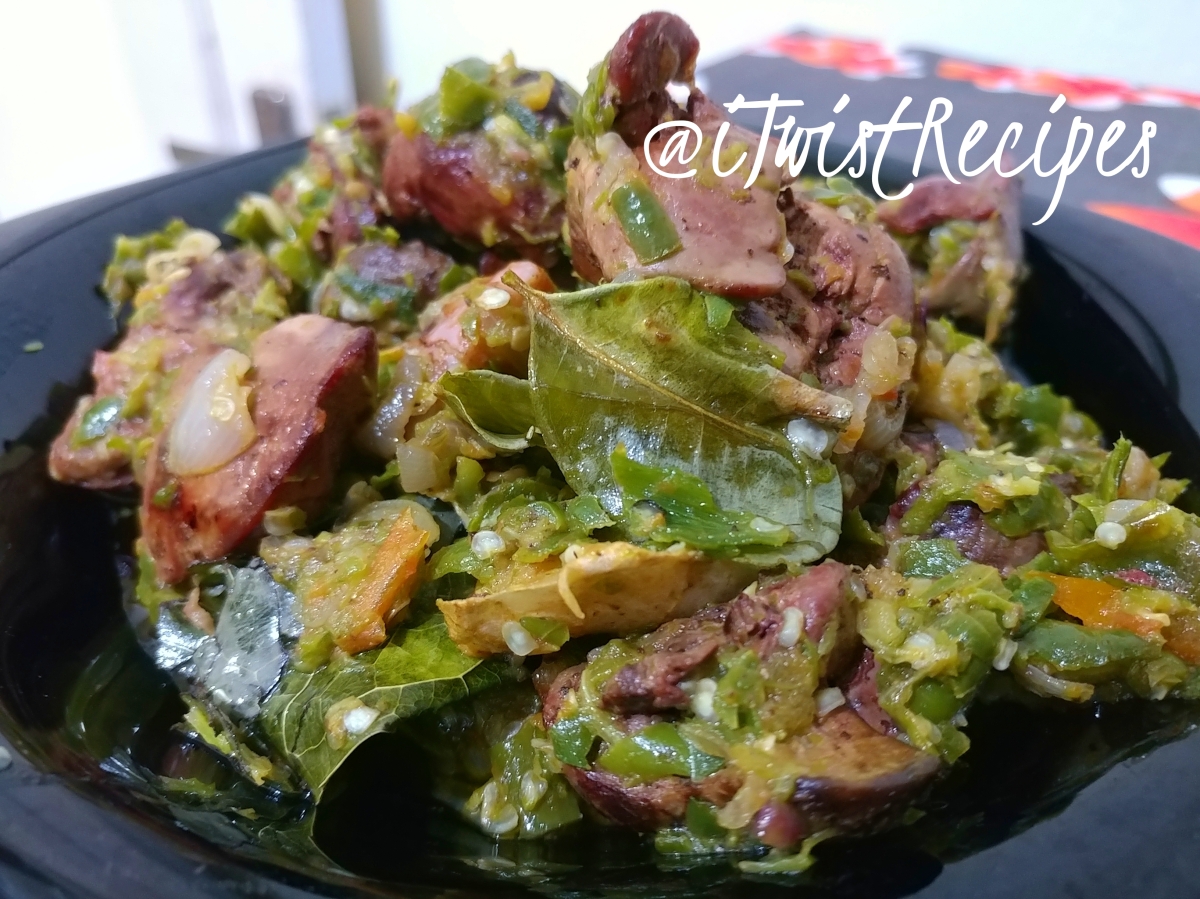
Spicy green chili chicken gizzard & liver

I had the inspiration to cook it from a shared post by a friend of mine in Facebook. The recipes were different one to another, but I got the idea.

Then, just based on my taste, I decided to go with my guts. Here it is!

Ingredients:
– 100 gr curly green chilies
– 100 gr large green chilies
– 100 gr bird’s eye chilies
– 10-15 medium shallots
– 5 garlic cloves
– Salt
– Lime leaves
– Bay leaf
– 2 cm ginger
– 2 cm galangal
– 5 pairs of liver & gizzards (around 500 gr)
– 3 small green tomatoes or 1 red tomatoes

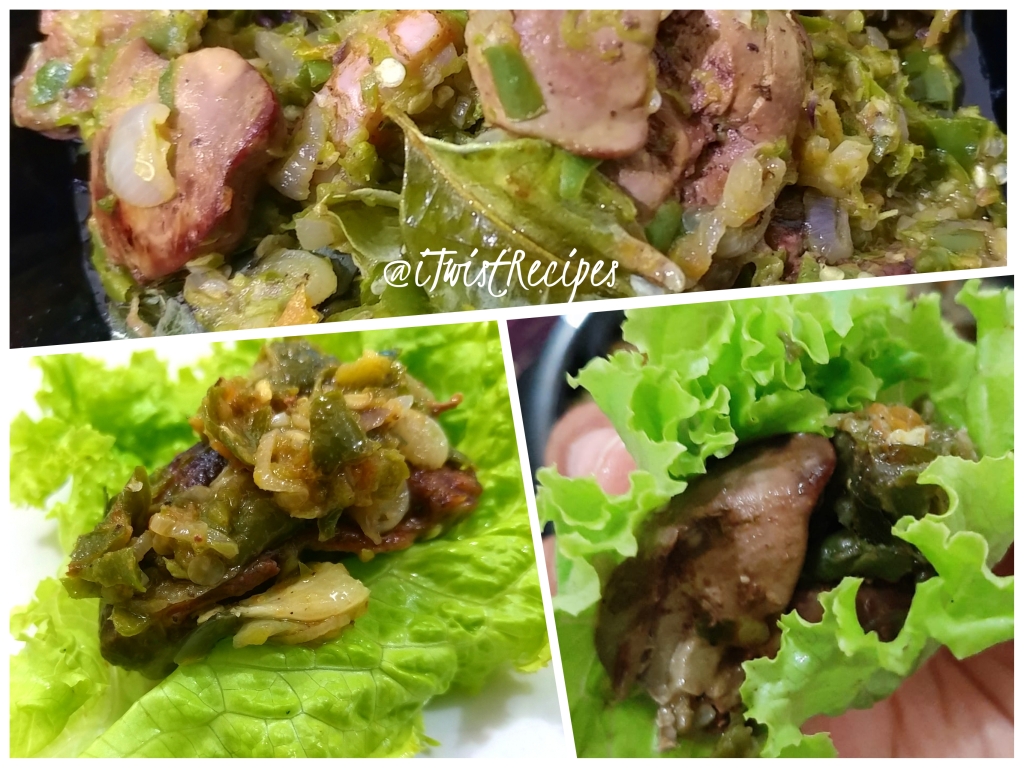
Optional: curly lettuce (I’ll tell you why later! 😉)

Instructions:

  1. Simmer the liver & gizzards along with 2 cloves of garlic and salt until the gizzard is tender.
  2. Do not throw away the water after the gizzard is tender. Instead, put all kind of green chilies and the tomato and boil until they’re soft.
  3. Fry the liver and the gizzard (half fried) and then put them aside.
  4. While frying the liver and gizzard, slice the shallots and 3 cloves of garlic. Once done frying the liver and gizzard, then saute and caramelize the shallots, garlic, lime leaves, bay leaf, galangal, and ginger.
  5. Use the food processor, pulse the chilies and tomato only until they’re “shredded”. Or you can also use the mortar and pestle. I’m lazy. I chosed food processor. Not even a minute!
  6. Once the ingredients in your pan are caramelized well, mix in the shredded chili and tomato for about 2 minutes, then add in the liver and gizzard. Just mix them and that’s it. You’re done!

I had an ice cream sandwich earlier in the afternoon. So, to reduce my guilty feeling, I tried to be healthier on my dinner. I was inspired by the Bulgogi that I ate by wrapping it up with the lettuce, so I also wrap it up with the curly lettuce! And guess what? I LOVE IT!

Selat Solo (Javanese Beef Steak)

Ingredients:

– 1 kg tenderloin/ shank
– 20 shallots (more or less)/ 1 big green onion
– 3 garlic cloves
– 3cm ginger
– 2 ghost chillies
– salt
– pepper
– 5 tbsp tomato ketchup
– 2 big fresh tomatoes (dice it)
– 1 big fresh tomato (slice to 6)
– Sweet soy sauce (5 tbsp)
– lettuce
– 4 boiled eggs
– 4 tbsp sweet soy sauce
– a bit of freshly ground nutmeg
– 1 tbsp corn starch

Complements:
– fried potato wedges
– steam/ boiled green beans and carrots
– mayonnaise

Instructions:
1. Marinate the beef with salt and pepper for at least 3 hours
2. Blanche the potato wedges, carrots and green beans in salted water.
3. Put the beef and the veggies in the fridge
4. Grind/ blend shallots/ onion, garlic, ginger and chilies with a bit of coconut oil in the food processor
5. Dice the 2 tomatoes
6. Heat up the pressure cooker on the big flame, pour about 3 tbsp of coconut oil once you can see the smoke, brown the meat on all sides. About 1-2 minutes each side. Put them aside.
7. Start to sautee the shallots-garlic-ginger-chili mix. About 3-4 mins, on a medium flame. Then add in the diced tomatoes, until they go wilted and a bit caramelized.
8. Add salt, pepper, freshly ground nutmeg, sweet soy sauce, tomato ketchup. Stir it up, add the browned meat and boiled eggs.
9. Pour boiled water around 1-1.5 ltrs, crank up the heat and cover the pressure cooker with the lid. Turn the stove off 20 minutes after sizzling.
10. Move the meat and the egg to a big wok, and strain the broth.
11. Simmer it to the consistency that you want (I love the broth so I always leave more than enough broth, and anyway…you need the broth to be the gravy)
12. When it seems enough gravy you have in the wok, then, add the mix of 1 tbsp corn starch with a bit of cold water. This will make the broth turns to gravy consistency.
13. The rest? Just fry the potato wedges, steam/ boil the carrots and green bean. Don’t take too long for boiling them, since crunchy veggie is the key.
14. To serve it, just arrange the egg, lettuce, sliced tomatoes, fried potato wedges, the veggies on the plate and put the meat in the middle. Pour the gravy all over and put 1 tbsp mayo to complete it.

It’s easy. Just too much to do 😁

Snack: Easy Corn Fritters

It’s a twist of standard recipe of corn fritters in Indonesia. Eggless, dairy-free, sugar-free.

I cannot make this snack with egg since my bf is allergic to it. So I gotta think how to twist the standard recipe out there and make sure that it’ll look exactly the same.

Plus, since I love coriander, I have to find ways also to incorporate it into this recipe, so the batter taste like my tofu burger in blanket. Plus, I’m serious with the ice cold water. It makes all the different. It’s crispy outside and soft inside. Just the way I like it.

This recipe will give you 8 big fritters. You only see 6 because my bf “stole” 2 before I took the pic! ha ha ha

So here we go:

INGREDIENTS:

  • 250 gr peeled sweet corn
  • 2 carrots, grated
  • Spring onion
  • 1 stalk celery
  • 1 clove garlic
  • Salt
  • White pepper
  • 1 tsp Coriander seeds
  • 1/2 cup of plain flour
  • 1 tbsp rice flour
  • 1 tbsp corn starch
  • Ice cold water

INSTRUCTIONS:

  1. Mix everything, and pour water only until it’s attached to each other. Not too thick, but definitely not runny. We don’t use eggs here remember?
  2. Heat up the oil, it should cover the fritter well. Then, use a laddle to scoop the batter and fry it until it’s golden brown.

That’s it. Nice and easy snack!

Easy Sugar-free Refrigerator Pickles

For pickle lovers who try to stay away from sugar, you come to the right place. Not only it’s sugar free, it’s also easy without any weird ingredients or sugar replacement.

Since I’m not a believer of sugar replacement or any sweetener since I believe that everything processed is not good for our body, here is a twist of some Keto pickles recipes. Of course, without any sweetener or sugar.

I live in Indonesia and our pickles is actually a mix of cucumber, carrots, shallots and some, will add chilies. So you are most definitely okay to add chili in your pickles. I cannot. My bf cannot handle heat. 😜😜.

Alright, here we go. FYI, it will give you 2 x 500 gr jars of pickles. If you only wanna make 1 jar, then cut everything half.

Ingredients:

  • 1 Japanese cucumber (dark green, long and taste is sweet. Yes, I’m taking it’s sweetness to replace sugar). Dice, slice do whatever you like.
  • 1 big carrot. Again, cut it however you like.
  • 10 medium shallots. Cut into half or quarter, depending the size
  • 1 small yellow onion. Slice it thin
  • 1 clove of garlic. Crushed.
  • 3 tsp black peppercorn
  • pinch of sea salt
  • 10 tbsp white vinegar
  • water

Instructions:

  1. Prepare the veggies, then put them in a bowl, then mix with peppercorn and pinch of sea salt
  2. Crush the garlic, and put 1/2 in each jar.
  3. Add the veggies in the jars
  4. Pour 5 tbsp of vinegar to each jar
  5. Pour the water until covering the veggies.
  6. Close the jar, mix it well, put them in the fridge for 24 hours. That’s it!

Easy Eggless Non-Dairy Banana Bread Recipe

Hi again!

This is a very late post actually. I made this for my BF and was referring to this recipe from The Baking Fairy because it said this recipe is for Vegan (he’s a plant-based guy). But, I also found out that some Vegans won’t agree if brown sugar is considered vegan because it’s basically bone-chared white sugar mixed with molasses. You can read about it here and here and go on with what you like. The plant-based dietitian also not recommending any kind of sugar, so… I guess this recipe falls into a non-dairy and eggless category only. (Is it?! Darn I’m so not the expert for this!)

But to be safe, I’d just call this recipe Banana Bread instead. Eggless, non-dairy, banana bread. An easy one.

Back to the recipe for my reference, I only twisted 2 things. I replaced vegetable oil with coconut oil and almond milk with soy milk. Ah, one more! I didn’t use any banana slices for the topping. So that’s it! Let’s roll!

INGREDIENTS:

  • 3 medium ripe bananas
  • ¼ cup coconut oil
  • ¼ cup soy milk
  • ½ cup light brown sugar (to make it vegan, maybe replace it with ground dates?)
  • 2 tsp pure vanilla extract
  • 2 cup unbleached all-purpose flour
  • 1 tsp cinnamon
  • 1 tsp baking soda
  • ½ tsp salt

INSTRUCTIONS:

  1. Preheat the oven to 350F. Put the parchment paper around the inside of the loaf pan.
  2. In a large mixing bowl, roughly mash the bananas. I love to leave some chunks as it looks better after baked, but of course, it’s really up to you!
  3. Add the brown sugar, oil, vanilla, and soy milk, and whisk everything together. (Maybe, just maybe, if you wanna use dates to replace the brown sugar, you should ground them first in the food processor before mixing everything in this step).
  4. Sift in the flour, baking soda, salt, and cinnamon, and mix using the spatula.
  5. Transfer the batter to your prepared pan.
  6. Bake for about 45 minutes, then cover with foil and bake for 10-15 minutes longer, until a toothpick inserted in the center comes out with just a couple of crumbs.
  7. Take out the bread from the pan and put it on the cooling rack.

20180405_191432_HDR (1)

It was so good, cinnamony (is that even a word?!), moist. It’s so good that my BF didn’t even bother to slice the bread with the knife anymore. He’s just using his fingers. Look at this!!!

But well… I admit manners are mostly gone when your food is that good. Mine too. hahaha!

Easy Recipe: No Bake Peanut Butter Oatmeal Cookies (EXTRA: Homemade Peanut Butter Recipe!)

Hello again! It’s been a while since my last post, I know. I had a privilege of getting our assistant to cook for us so, yes… I didn’t do much. hihihi…

If you read my previous posts, you should know that my bf planned to get to the plant-based lifestyle. He started it 8 days ago and honestly, I feel sorry for him. He (still) looks miserable everytime he eats the plants on his plate. He’s never a huge fan of vegetables and fruits.

So I tried to find ideas for better plant-based recipes online and found this one. But as usual, I always try to twist it to the ingredients that we have at home. The original recipe can be found here, but you are very welcome if you keep reading this post (I thank you!).

What did I twist? Almond milk and dates. Plus, I’m making my own peanut butter (I will share the recipe here too. So let me start with Homemade Peanut Butter recipe.

INGREDIENTS:

  • 1 cup raw peanut
  • 1 garlic clove
  • Enough coconut oil to fry
  • 4 tbsp cup coconut oil
  • 1 tsp of sea salt

TOOL: Mini chopper/ food processor/ blender

INSTRUCTION:

  1. Heat enough coconut oil to fry the peanut.
  2. When the oil is hot enough, fry peanut and the garlic (cut to big chunk) only about 1 to 2 minutes (half done).
  3. Transfer the half-done fried peanut and garlic to the mini chopper/ food processor along with the sea salt and 4 tbsp of coconut oil. Blend to your desired consistency.
  4. For this no-bake peanut butter oatmeal cookies recipe, I choose to blend the peanut to a fine blend.


Alright! Now we already have our homemade peanut butter. Let’s continue to the No-bake peanut butter oatmeal cookies.

INGREDIENTS:

  • 1 cup of homemade peanut butter
  • 1.5 cups of rolled oats
  • 5 tbsp of soy milk
  • 3 tbsp coconut oil

TOOL: Food processor & refrigerator

INSTRUCTION:

  1. Just throw all ingredients in the food processor and keep processing it until it looks like dough that you can roll to a ball.
  2. Prepare your tray, and roll the dough to about 1-inch balls, and use a fork to shape it into cookies.
  3. Put them in the fridge and you can eat it anytime you want!


You must wonder how’s the taste, right? I can only say, He approved. He said the cookies are delicious! So go on try and tell me how it goes!

TIPS: Easy Microwave Cleanup

TIPS: Easy Microwave CleanUp

I am writing this because my bf was surprised with the result after I did the microwave cleanup yesterday. I just realised that’s the first time I showed him what I did and how easy it was. So, I decided to share this with you.

I started doing this cleanup method years ago (more than 5 or 6 years ago) after reading the tips somewhere on the internet. It works like a charm every time! So, whoever posted the tips before, I thank you for saving my time and energy cleaning up the greasy microwave.

First of all, I am easily disgusted. By dust, grease, mould, anything smelly and looking yucky, you name it. So cleaning up microwave is not my favourite thing to do. That was the reason why I tried to postpone the cleanup schedule for it. But that changed years ago after I found this tips.

These are what you NEED:

  • a microwave-safe bowl
  • Water (half the bowl)
  • 1/2 slices of lime/ lemon.

INSTRUCTIONS:

  1. Put the lime/ lemon and water in the bowl and then put them in the microwave.
  2. Set to heat up until the water is boiling. The way I did it is set up to 2 minutes first, then 1 minute and 1 more minute after while watching it closely until I see it boiled.
  3. After the water boiled, leave it in the closed microwave for 5 – 10 minutes.
  4. Then, remove the bowl (be very careful, it’s hot!), and all you have to do is wipe all the surface using a damp cloth.

That’s all. I don’t see dirty nails right after anymore! It’s easily wiped and the result, it looks like a brand new microwave.

So there it is. Try it! Save your time, energy and your well-manicured nails!


DIY: Easy Ground Celery

Do you ever feel uneasy to buy a stack of celery from the store (which is usually too much for 1-time cooking)? I do. Especially because I only cook for 2. But keeping it in the fridge is also not a good idea, because the day after, the leaves are withered. But the stalks can still be kept wonderfully for about a week in a meal-box full of water in the fridge.

What made me uneasy is to throw away food. The leaves could be such an enjoyable flavour in your cooking. So, one day I tried to dry the leaves in the oven. The logic was… few minutes in the oven, the leaves will be dried, and then I can just use my grinder (the same grinder I use for other dry seasonings) and then use the dried/ ground celery for soup, ranch dressing, or dry onion soup mix dip and so on and so on.

So I did!

INGREDIENTS: Celery leaves.

TOOL: Grinder

INSTRUCTIONS:

  1. Pre-heat your oven to 175 degrees Celsius/ 350 degrees Fahrenheit.
  2. All you need to do is to pick only the leaves and put them in the baking pan.
  3. Put the tray in the oven and leave it there for 10 minutes, then after 10 minutes, check if it’s dried. Warning: Never leave it. I did it once, and then I completely forgot I have celery in the oven! As a result, I had burnt celery leaves. (AUCH!)
  4. When your leaves dried and easily crumbled, take the tray out of the oven, transfer the celery to the grinder, and grind to your liking.

Here is the result (up close and personal!)

20180223_174342_HDR (1)


Easy Cheese Sauce Recipe

This recipe has been in our household for years now. I begin to make it around 3 years ago, and then I stop looking. It is so good that my BF decided to use this sauce for his lasagna, mac & cheese and my scalloped potato.

You won’t believe how easy it is, especially if you live in Indonesia (like I do!), where cheese is so expensive and you don’t want to use any recipe that is using more than 2 type of cheese.

For your information, I twisted this recipe from KetoDiet Blog and adjust it to my easiness in doing it here. So if you are following Keto lifestyle, feel free to use the original recipe since mine is not (but I put the substitute in the ingredients section if you want to do it).

So here it goes!

INGREDIENTS:

  • 2 tbsp unsalted butter
  • 114 gr cream cheese
  • 1 cup/ 250 ml fresh milk (or if you are completely Keto, replace with 1/2 cup of whipping cream + 1/2 cup of water)
  • 227 gr cheddar cheese, shred it.
  • Crushed black pepper
  • Optional: dash of ground paprika, onion powder, garlic powder, ground celery

INSTRUCTIONS:

  1. Use the pot, melt the butter over medium flame.
  2. Then add in room temperature cream cheese and whisk it so all are incorporated.
  3. Then add in the milk (or the whipping cream), start with 1/4 cup and keep whisking it until it looks smooth. Keep adding the liquid slowly while whisking it.
  4. Wait until you can see the little bubbles (it means your liquid is hot enough).
  5. Turn off the flame, and add the cheese while keep on whisking it until your cheese melted.
  6. Up to here, the cheese sauce is already lickable! But… I love to add up some other ingredients. I always add a dash of ground paprika, crushed black pepper, onion powder, garlic powder and ground celery.

One thing we both always do after I finish making this sauce: finger licking the bottom of the pot after the sauce is transferred. It’s that good! Last night, it was my BF’s turn, since he’s making his amazing lasagna using this cheese sauce. It was a treat! Look at this! It looks YUMMY!!!

Wait. What?! Recipe for the lasagna? He doesn’t even want to share with me. I know. Bummer!

20180220_190229_HDR